• HOME
  • An Introduction To Antique Garden Ornament Restoration

An Introduction To Antique Garden Ornament Restoration

Antique garden ornaments hold a special spot in many yards, parks, and historic estates. These pieces tell stories from another era and add loads of character to any outdoor space. Time, changing weather, and even regular use can wear them down, but proper restoration can make a world of difference. I’m going to break down the basics of antique garden ornament restoration to help you preserve and refresh these unique treasures.

A collection of weathered stone garden ornaments, including urns, statues, and planters, on a rustic outdoor workbench amidst garden tools and greenery.

Why Restore Antique Garden Ornaments?

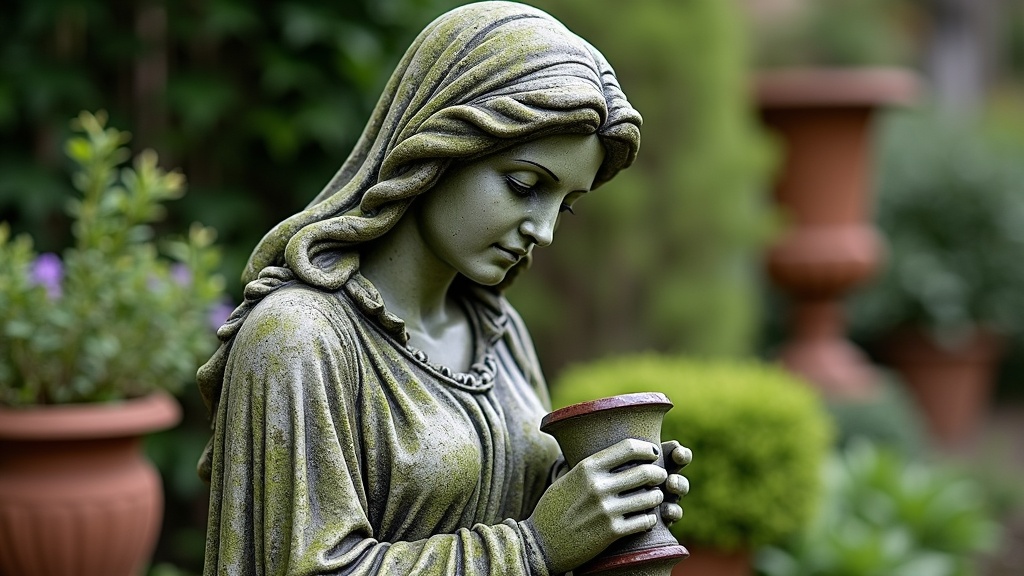
Antique ornaments are seriously valuable, and that goes beyond just dollars. Their beauty and historic charm set them apart. Pieces like cast iron urns, stone statues, terracotta pots, and old fountains do more than decorate your space. They link us to the past and boost curb appeal in ways newer items just can’t match.

Restoring these items helps prevent further damage, keeps the garden looking sharp, and even helps preserve local heritage. Whether you want to keep a family heirloom in top shape or revive a flea market find, restoration gives these pieces a new shot at life. The restored pieces can completely transform an average outdoor area by infusing it with personality and history.

Getting to Know Your Garden Ornament

Before picking up paint or scrubbing away dirt, I always say it’s smart to know what you’re working with. Each piece has its own story, so start by figuring out a few key details:

  • Material Type: Is it stone, iron, concrete, terracotta, or maybe lead? Each one needs a different approach.
  • Age and Origin: Older pieces or ones from certain makers might need gentler care, especially for items that are rare or from well-known designers.
  • Condition: Take note of chips, cracks, moss, rust, or missing pieces. A good inspection helps you choose the right restoration steps, so you don’t accidentally do more harm than good.

If you’re unsure, snapping a few photos and chatting with a restoration pro, local historian, or even garden antique dealers can point you in the right direction.

Common Restoration Challenges (and How to Tackle Them)

Every antique garden ornament brings its own quirks, but some problems pop up again and again. Here are a few I’ve dealt with most often, plus a quick tip for each one:

  • Soil and Moss Build-Up: Gently clean with a soft brush, water, and maybe a mild soap for tough grime. High pressure water can damage softer surfaces, so it’s better to skip the pressure washer if you want to avoid harm.
  • Rust on Metal Items: Remove loose rust with a wire brush. For stubborn areas, a rust converter or remover can be super handy. Finish with a metal primer and weatherproof paint or wax if needed. Keeping metal items covered with wax can also keep rust at bay for longer.
  • Stone Erosion: Handle fragile stone with care. Sometimes, just cleaning is enough, but serious cracks or missing chunks may call for professional help or special stone fillers. Soft bristle brushes work best, and avoid acidic cleaners on limestone or marble.
  • Broken or Missing Parts: Restoration epoxies or specialist adhesives work for simple fixes. For bigger repairs, you might need to cast replacement parts or consult a skilled pro. It’s not uncommon for outdoor statues to need new hands, feet, or decorative details remade to original specs.
  • Paint Flaking or Loss: Peeling paint needs to be gently sanded away. Once you’re down to a stable layer, prime and repaint with exterior grade paints designed for your material. Avoid thick coats and let each layer dry fully before applying the next.

Easy Steps for DIY Garden Ornament Restoration

Tackling your own restoration project is easier with a little knowhow. Here’s a handy step-by-step plan I use:

  1. Clean Your Ornament: Brush off dirt, leaves, and organic debris. Mix up a bucket of warm water with a little dish soap, and use a soft brush or cloth. For really stubborn moss or algae, try diluted white vinegar but keep it away from delicate surfaces like old marble or limestone.
  2. Remove Old Paint or Rust: Work with sandpaper or a wire brush on small areas. Specialty paint removers can help, but doublecheck they’re safe for antiques. For iron pieces, always treat rust before you repaint.
  3. Make Basic Repairs: For small chips or cracks, use a filler made for your ornament’s material. Let everything dry or cure fully according to the package instructions. For larger missing chunks, sometimes a mold or form is needed to create a new piece, especially for ornate designs.
  4. Paint or Seal: Pick paints, stains, or sealants made for outdoor use. For stone or terracotta, a breathable sealant helps prevent moisture troubles down the road. Always follow package instructions and aim for dry, mild weather during application.
  5. Final Touches: Stand back and look over your work. Little finishing details, maybe some gentle distressing to keep an authentic look or buffing newly waxed metal, will make your piece shine. After you’re finished, take a photo to track your progress over time—it’s surprising how much of a difference restoration makes!

Restoration takes patience, but the payoff is seeing your garden ornament looking better than ever and preserving a slice of garden history. Plus, there’s satisfaction in knowing you handled the job on your own.

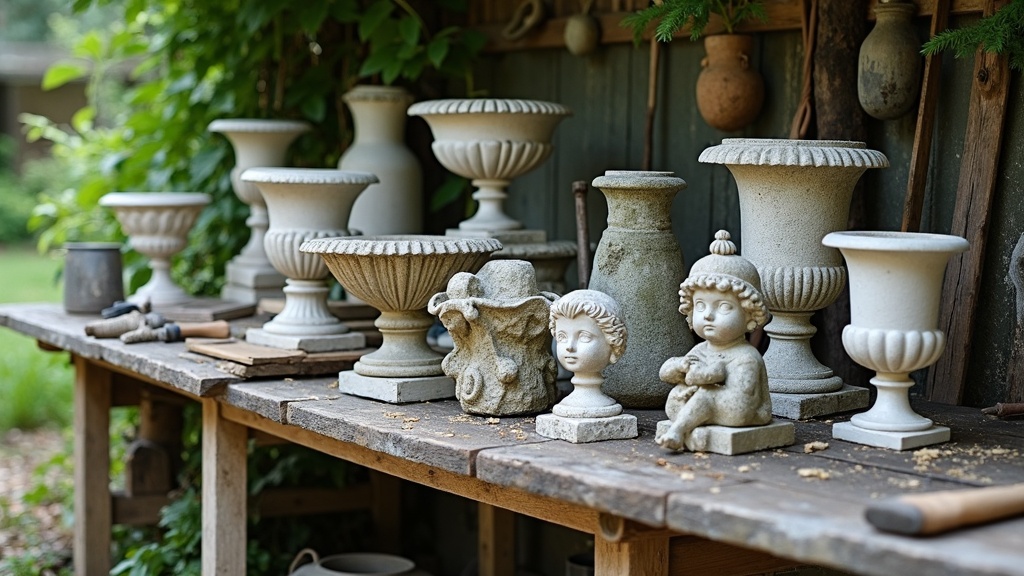
Materials and Tools You’ll Find Useful

You don’t need an entire workshop to restore vintage garden ornaments, but having these supplies makes the job smoother:

  • Soft and medium stiffness brushes
  • Microfiber or cotton rags
  • Mild cleaners (like dish soap or diluted vinegar)
  • Sandpaper (various grits)
  • Wire brush (for metal pieces)
  • Rust remover or converter
  • Paint scrapers
  • Outdoor grade paints and primers
  • Sealant or wax (for metal, terracotta, or stone)
  • Appropriate adhesives or fillers (check product labels for material match)
  • Protective gloves and eye protection

Most of these are easy to find at hardware or garden supply stores. Specialty restoration products can be ordered online or picked up at shops catering to restoration pros. You may also want a paint respirator mask for working with fumes or dust, plus drop cloths to protect your workspace.

Extra Tips for Preserving Antique Ornaments LongTerm

Restoration isn’t a one-and-done deal. A few ongoing habits go a long way to keep antique garden ornaments looking great for years on end:

  • Regularly dust off debris and rinse with water so dirt doesn’t build up and cause wear.
  • Apply a new layer of paint or sealant every few years in line with product guidelines and the weather in your region.
  • If you spot cracks, rust, or moss, treat them as soon as possible to stop damage from spreading before it gets serious.
  • Consider moving fragile or precious items indoors during winter or really extreme weather to avoid unnecessary wear. Alternatively, cover delicate pieces with a tarp or temporary shelter if moving them isn’t practical.

Paying attention year-round helps you catch problems early, making sure your restoration work stands the test of time. A seasonal garden walk can help you notice changes like new cracks or moss patches so you can fix issues before they get worse.

Picking Out Reproduction Parts (If Needed)

Sometimes, parts of an ornament are just too far gone or missing. Seeking out reproduction finials, handles, or other pieces is common, especially for urns, benches, and fountains. Here’s how I usually approach it:

  • Bring clear photos and measurements if you’re searching for parts at garden centers or salvage yards. Pictures from a few angles will help sellers get a better idea of what you need.
  • Check online antique forums and specialty shops. There are some great places that sell reproduction hardware based on historical designs, and you may even stumble upon someone with just the piece you need.
  • If something absolutely can’t be matched, consider having a new piece custom made by a local craftsperson. Sometimes, adding a hand-crafted detail can set your ornament apart in a good way while still staying true to its vintage style.

Replacing parts is totally okay and won’t ruin the character of your antique. Just aim for the closest match possible so your ornament keeps its cohesive look and timeless charm.

Frequently Asked Questions: Antique Garden Ornament Restoration

Here are answers to a few questions I hear most often from folks getting started with ornament restoration:

Question: How can I tell if my garden statue is really old or just made to look old?
Answer: Older ornaments often have wear in spots that make sense, like weather-facing surfaces, and may show tool marks or maker’s stamps. Newer reproductions sometimes have a too-even finish or artificial aging. If in doubt, bring it to a local antique dealer or appraiser with outdoor decor expertise to help you spot the difference.


Question: What’s the safest way to clean fragile or crumbly pieces?
Answer: Skip harsh chemicals and brushes. Instead, use a gentle stream of water, your hands, and a soft cloth. If you feel unsure, check in with a pro before trying to clean things like historic stone or lead. Sometimes, leaving some patina is better for both preservation and aesthetics.


Question: Does restoring an antique ornament ruin its value?
Answer: Typically, honest repairs and cleaning actually help preserve or improve value. Overcleaning or using modern paints in the wrong way can hurt value, so when in doubt, keep things simple and gentle. Try to document any significant restoration work for future reference, which collectors may appreciate.


Wrapping Up

Antique garden ornaments are a real treat for any outdoor space. Learning some restoration basics, picking the right tools, and treating materials with care will help you get the most out of these eye catching pieces. A little patience and good products really make a difference, letting your garden history shine for years and making each piece, whether grand or humble, a standout in your landscape.

Posted in Uncategorized

One thought on “An Introduction To Antique Garden Ornament Restoration

  1. This was such a well-rounded and informative article! I really appreciated how you combined technical know-how with relatable real-life examples. It made the whole topic of indoor antennas much more approachable. I agree that their versatility and cost-effectiveness make them a perfect choice for both city and suburban living. I’m wondering, from your experience, do amplified antennas always provide noticeably better reception, or is placement still the bigger factor?

Leave a Reply

Your email address will not be published. Required fields are marked *

An Introduction To Antique Garden Ornament Restoration

Antique garden ornaments are more than just decorations; they tell the story of gardens and the people who loved them. From weathered stone statues to cast iron urns, these pieces add soul and charm to outdoor spaces. When these treasures break, crack, or gather centuries of grime, restoring them doesn’t just spruce up a garden, it helps keep history on display for everyone to enjoy. My own first try at fixing a mossy sundial taught me just how satisfying (and tricky) it can be to bring these artifacts back to life.

Weathered stone garden statue being cleaned with a soft brush in a leafy garden

What Inspires People to Restore Antique Garden Ornaments?

The draw of garden ornament restoration usually comes from a mix of nostalgia, love for the outdoors, and a fascination with objects built to last. I’ve met folks who stumbled into this work while fixing something for their own backyard, then couldn’t stop. There’s a real pull in knowing that your hands help a fountain or sundial stand tall for the next hundred years.

Garden history fans like Anna have shared how meaningful it feels to rescue pieces that once shaped the experience of historic estates or quaint city gardens. “When I clean away decades of moss from an old terracotta urn, I wonder about all the plants and parties it’s seen,” she told me. Some, like John—a retired mason—began by patching up family heirlooms and soon found themselves helping neighbors save everything from crumbling birdbaths to rusty wrought iron gates. For a lot of people, it’s about turning back the clock just enough so these pieces can keep adding beauty outdoors.

Sometimes, restoring a forgotten ornament brings people together. Local garden clubs often organize events where members help each other with repairs, swapping stories about family-run estates and public parks. The experience of giving new life to neglected treasures often sparks a passion that lasts for years, inspiring others to try their hand at preservation. Restoring garden ornaments offers a way to connect with community traditions and even learn lost craft techniques. The rewards go beyond the object itself, forging a tangible link with the past.

Main Steps of Restoring Antique Garden Ornaments

Restoring old garden pieces isn’t quite the same as fixing antique furniture or art, but many skills do overlap. I split the work into a few key phases:

  • Assessment: The first thing I do is check the ornament for cracks, missing chunks, corrosion, or damage from weather and roots. Knowing what kind of material I’m dealing with—stone, metal, ceramic, or concrete—guides every next step.
  • Research: I often dig through old photos of gardens or ask around about the ornament’s history. Sometimes I spot original maker’s marks or can match a statue’s style to a particular era or region, which makes the whole process feel more connected to the past.
  • Cleaning: Cleaning garden ornaments can be surprisingly involved. I always start gentle, using soft brushes or sponges, then move up to diluted soaps or poultices. For moss or lichen, a simple mix of water and vinegar can work, but I test anything new on a hidden spot. Metal pieces sometimes need a soak in rust remover or careful sanding. In all cases, avoiding harsh chemicals is pretty important, especially on softer stone and pottery.
  • Repair and Conservation: Filling in chips, reconstructing missing details, or patching cracks comes next. For stone, there are special limebased mortars; metals might need soldering or rust protection. If I need to color-match repairs, I check weathered areas to blend new work in lightly. Some restorers go as far as recreating decorative motifs with putty or 3Dprinted pieces before blending and painting them to match the original ornament.
  • Sealing and Protection: Once everything’s sturdy, I seal porous stone or terracotta to help slow down future weather damage. Metals get a coat of wax or weatherproof paint for the same reason. I log what I’ve done for anyone working on the piece down the line.

Every restoration job feels like its own puzzle. Some pieces are so covered in moss that you have to guess the pattern until you clean a test area. Others have old paint hiding original detail, and careful scraping reveals a whole new look underneath.

Sometimes a project demands blending modern techniques with classic restoration. For instance, ultrasonic cleaning tools can safely lift years of grime from fragile concrete or metal ornaments. Digital archives have made it easier to track down images of similar garden pieces, helping restorers figure out missing features or proper color schemes. More advanced resin fills and 3Dprinting make it possible to create replacement parts that are stronger and more weatherworthy than ever, all while retaining the ornament’s authentic look.

Real Stories from Garden Ornament Restorers

People restoring garden antiques often have tales full of surprises and creative fixes. I’ve picked up a lot just from standing in their workshops or watching them work in a leafy corner.

Anna – Stone Ornament Restorer
Anna showed me a limestone birdbath she’d found half-buried, its base split from twenty winters of frost. She mixed up traditional lime mortar to reset the pieces, then carved a new foot out of matching stone. “The trick is not aiming for perfection but for stability and harmony. Proof of age makes it real.” The birdbath looked both solid and authentic, ready for birds and curious guests for years to come.

John – Metalwork and Iron Restorer
John’s favorite project is a set of iron garden gates from the late 1800s. Rust had eaten away a few scrolls, so he used his old blacksmithing tools to forge replacements, then treated the whole piece with a rust converter before sealing it with linseed oil. “I’m careful to keep every hammer mark. That’s the memory of the first maker.”

Emily – Terracotta Expert
Emily spends her weekends patching up old pots and urns for local gardeners. “With terracotta, cleaning needs patience. Any scraping risks breaking thin rims, so sponges and a dental pick go a long way.” She often fills small cracks with tinted mortar and presses in little fragments left over from similar pieces. Her proudest moment? Delivering a totally mended planter to a customer’s 90-year-old mother, who “finally got her favorite rosepot working again.”

All three told stories of unexpected twists, like finding initials etched under years of grime or realizing an ornament had spent time in a historic public park. John once uncovered an old family crest beneath peeling paint on a section of fence he was restoring, prompting a local history group to dig into its past. Emily laughs about the time she rescued a flowerpot only to realize it originally belonged to the town’s legendary rose grower.

Common Challenges in Restoring Garden Ornaments

The outdoor life is rough on anything sitting outside for years. Here are some things I’ve bumped into while fixing up garden pieces:

  • Weather Damage: Freeze-thaw cycles crack stone and concrete, while sunlight can fade painted designs. Water can sneak into tiny cracks, breaking them open over time. I often find old repairs (like cement globs from the 1970s) that didn’t age well.
  • Biological Growth: Moss, lichen, and algae root into cracks and sometimes help walls crumble faster. Removing them gently is tricky, since aggressive methods tear up surfaces or leave scars.
  • Lost or Fragile Parts: Pieces like urn handles, statue fingers, or decorative scrolls break off or go missing. Reconstructing these by hand or matching materials can be slow work, and it’s easy to make a repair too perfect or too visible if you’re not careful.
  • Material Matching: It’s tough to find the right aged stone, vintage bricks, or matching ceramic glazes. Sometimes I have to hunt through salvage yards or ask other restorers for advice. If nothing matches, blending new materials with subtle pigment or surface treatments helps repairs fade into the background.

Dealing with Surprises

I once pried off an old cement patch on a statue and found an original maker’s mark hidden underneath. A friend uncovered a nest of antique coins inside the hollow base of an urn, probably stashed there decades ago. These little discoveries often mean changing plans mid-job or reaching out to owners with new ideas about their ornament’s story. Sometimes, a hidden signature or a date carved on the bottom can completely change how a piece is valued and cared for.

Modern Concerns

Some new sealants and epoxy fillers promise quick, easy results, but not all play nicely with old materials. I always test on scrap pieces or small areas to see how they hold up to sun and rain. Experienced restorers often recommend sticking to breathable, reversible treatments whenever possible, so future fixes aren’t made harder by what I’ve added. And with all the interest in DIY, I get lots of questions about safe cleaning methods that won’t destroy old finishes. My advice—if the piece means a lot, ask for help with the trickier repairs.

Disposing of old, crumbling pieces in a way that minimizes environmental harm has become a popular concern too. Salvaging materials for new projects, donating them to garden societies, or finding creative ways to blend fragments into garden mosaic paths are ecofriendly options.

Favorite Tools, Materials, and Methods

The best garden restoration kits usually start simple. These are the ones I always keep handy:

  • SoftBristle Brushes and Dental Tools: Perfect for cleaning out fine detail or scooping out moss from small cracks.
  • Sponge and Buckets: Keeps everything wet and gentle during cleaning, since most old surfaces hate going dry and dusty.
  • Mortar and Epoxy: Limebased mortar is great for old stone or bricks, and flexible epoxies work for metal cracks or delicate repairs on ceramics. I always use tiny amounts and blend them for best appearance.
  • Putty Knives and Modeling Tools: For shaping new details or smoothing out filled spots. A small set of sculpting tools comes in handy for ornate pieces.
  • Sealants and Waxes: Stone gets a breathable waterproofer, terracotta can take a silicate treatment, and metals like iron love a protective wax coat over oilbased paint.

I’ve also begun experimenting with 3Dprinted molds to recreate missing bits of ornament, which helps when sculpting by hand won’t cut it. Digital tools like portable moisture meters let me spot hidden water damage inside old ornaments. Still, lots of restoration comes down to a careful touch, a good eye, and learning from each new project. Sometimes the smallest brush or lightest hand makes the greatest difference in saving fragile details.

Advice for Those New to Restoring Garden Ornaments

  1. Start with Easy Fixes: A simple repair or gentle cleaning is a great way to build skills. Practice on less valuable pieces, and don’t stress over small mistakes.
  2. Read Up and Ask Around: There are some great books on masonry and garden history, plus forums online where hobbyists and pros swap tips. Local garden clubs sometimes host talks or demos by restorers too.
  3. Keep Things Gentle: It’s best to go slow and avoid power tools, bleach, or anything harsh until you understand how your ornament’s material reacts. Test everything first.
  4. Document Repairs: Take lots of before, during, and after photos. It makes it easier to track progress and share results with other enthusiasts.
  5. Respect the Piece: Aim to keep history visible. Try not to erase every sign of age, as sometimes those cracks and marks are the best part.

If you’re unsure, try restoring a small, common item first. Local flea markets are filled with potential practice pieces. Over time, your skills will grow, and soon you’ll be able to offer help to friends or contribute to community garden restoration projects. Each success adds to your toolbox and your appreciation for outdoor history.

Frequently Asked Questions About Antique Garden Ornament Restoration

Q: Can really damaged garden statues or urns be saved?
A: It depends. If the main structure is solid, cracks or chips can usually be fixed, and missing pieces are sometimes possible to replicate. But if a stone or concrete piece has crumbled beyond recognition, or if corrosion has eaten all the way through metal, some things might not recover fully. Restorers can give a straightforward assessment before any work starts.


Q: What’s the best way to clean moss and algae from an old ornament?
A: A soft brush and a mild soapandwater solution work well for most surfaces. For stubborn spots, a little diluted vinegar helps. Always rinse well, and never use harsh wire brushes or power washers, which can cause serious damage.


Q: Does restoration reduce an ornament’s value?
A: Quality restoration often helps preserve or even give a boost to value, especially if it’s done professionally and with respect for the original material. Overly aggressive or obvious repairs, or repainting in modern colors, can cause value to drop, so stick with subtle fixes and expert guidance.


Why Restoring Antique Garden Ornaments Matters

Caring for classic garden pieces doesn’t just make a backyard look good, it keeps a link open to different times and tastes. Each restored piece gets a new lease on life and continues to bring character to gardens both big and small. I find a real sense of pride in helping keep these treasures around for the next round of seasons, and I know others feel the same way. It’s about more than repair; it’s about keeping outdoor history alive, where everyone can enjoy it.

Posted in Uncategorized

Leave a Reply

Your email address will not be published. Required fields are marked *

To Page Top